What's a split keyboard and how did it take me 4 months and 400€ to build one?
'Build your own split keyboard', they said. 'It'll be easy', they said.
The Lily58L is a split mechanical keyboard that allows for extensive customization. You get to choose and customize every single part of your keyboard, from the choice of microcontrollers (USB-C!) to the keycaps. Then assemble and solder your own keyboard from that.
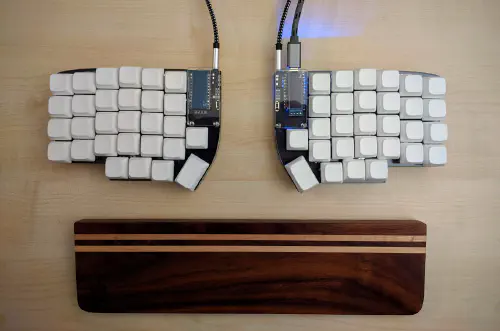
»What is a split keyboard?« I hear you ask. It is a type of mechanical keyboard that is split into two halves, one for each hand. The halves are connected via a 3.5mm aux cable and can be placed exactly at each hand’s natural resting position. Placing the hands further apart opens up the shoulders, a more ergonomic posture than that conventional keyboards force us into. This is especially relevant for office workers who spend long hours typing.
For me, building the Lily58L was an interesting and fun experience, but excruciating at times. This article is about my tale of battling a stubborn PCB for hours on end. For those considering taking on this project themselves, this is not a build guide. However, I included some tips that would have saved past-me a lot of time (and money), list the parts I bought, and explain the major steps I took and mistakes I made. If you think it’s cheap because you assemble it yourself, check out the list of parts and tools. In total, I spent almost 400€.
# Getting started
As a base, I used the Lily58L kit offered by the German shop keycapsss.com. The mechanical switches I chose needed to be quiet since I work as a software engineer in a shared office. The Korean Boba U4 switches are quieter than my MacBook Pro’s and have a pronounced tactile bump. As all of my gear has moved firmly into the USB-C era, I wanted my keyboard to match that. That’s why I went with two Elite-Cs for the microcontrollers that handle key input, macro logic, and communication on each half of the keyboard. Another benefit is that the USB port is mounted very firmly compared to their cheaper alternative, the Arduino Pro Micro. The Arduino’s Micro-USB port is famously easy to accidentally rip off. Whenever possible, I tried to chose European vendors, as they ship fast, don’t get stuck in customs, and offer good support.
After receiving all the required parts and tools, I got to work right away. My soldering setup looks super sketchy but did its job. At one point during the build, the tip of the cheap soldering iron I was using simply melted. Not sure if it was my fault, but the thicker tips worked fine afterwards.
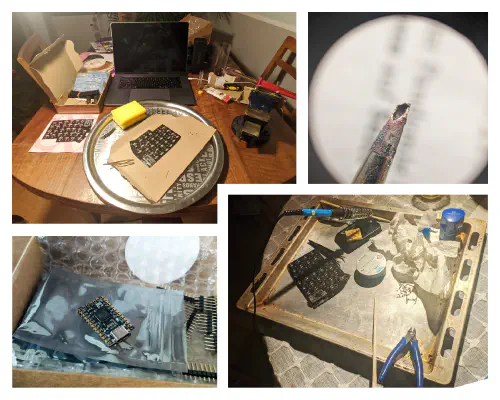
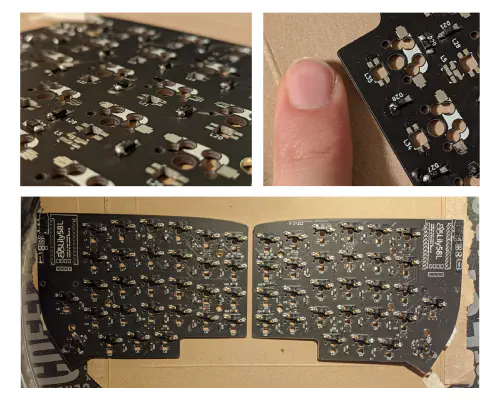
I started by soldering one diode and one key switch socket for each key. It turned out to be quite good practice since the diodes are quite small and I had to solder 232 points! Good thing I’d only have to do this step once.
# Battle of the boards
The next step was to mount the Elite-C for each half. The idea is quite straight-forward, you only need to place two rows of sockets on the PCB and solder them from the back. Then you place the controller on the sockets and insert thin header legs, which are soldered on the front. This way, the controller can be removed from the board in case it breaks. This is especially relevant for Arduino Pro Micros, which tend to break after some use. Since I bought two reliable Elite-Cs and was hoping to save some money, I didn’t attach them using sockets but instead soldered them directly onto the board.
After completing the right half, I was intensely excited when I plugged it into my Mac for the first time. Just a couple of weeks after deciding to buy it, I’d be typing on this awesome keyboard! I proceeded to flash the chip’s firmware and had a small heart attack when I noticed that one column of keys was not responding, but the problem was quickly solved by reflowing some of the admittedly poor solder joints on the PCB.
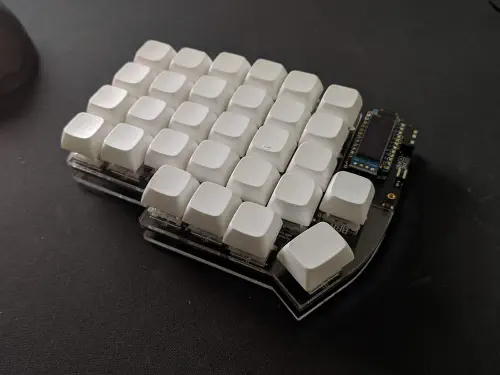
# First blunder
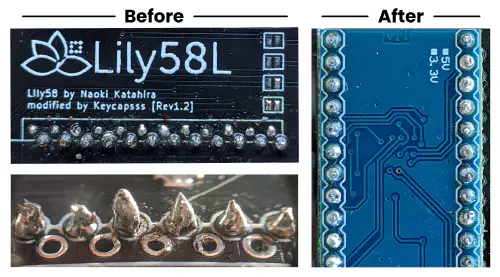
One half is done, just one more to go! Now comes the first fail. Since the PCBs are reversible, they have a microcontroller mounting point for the left-hand side and one for the right. Check out the build guide for a visual explanation. In the hubris I felt after completing the right half so quickly, I soldered the left controller in the wrong column, but I didn’t know that at the time. I happily connected the left half to try it out - with no success.
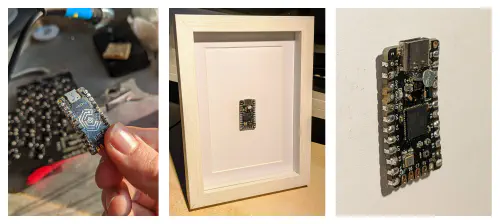
After many hours of trial and error debugging, reflowing all solder points, I was despairing. Thankfully, the kind people in keycapsss’ discord server were able to find the mistake: the wrong column. Now began a period of brutal war. I tried my best to desolder the microcontroller from the PCB to salvage the parts. I tried this for around 10 hours to no success, using desoldering wick, solder grease, and a hot air station, but still lost the war. In the end, I clipped the header legs to free the now broken controller. It is now framed on my wall and tells its story.
# The second blunder
A couple of weeks passed with no progress. I felt demotivated by all the effort I had put in, only to break two very essential parts. Also, I had some university exams to study for, so the keyboard’s priority dropped. After talking to the owner of keycapsss, I was able to arrange a replacement order without having to buy the whole building kit, to save some money. I bought one Arduino and one side of the PCB. Of course, all the other tiny parts had to be desoldered and reattached to the new PCB once it arrived. Great fun!
My second mistake was even worse than the first. After last time’s disaster, I took great care to mount the controller in the correct column this time. Once mounted, it didn’t take me long to figure out what I had overlooked - it was flipped upside down. It may have been due to the time that passed between the first and second attempt, or just plain stupidity. I didn’t bother to desolder the controller this time but rather went back to the shop’s owner to plead for one more replacement package to be sent to me.
Time to move all the tiny parts from the old to the new PCB again. Third time’s a charm - I mounted the new Arduino and it worked! The rest was child’s play. The key switch sockets make it very easy to insert my desired switches with a simple click. Mount the case, put some beautiful blank white PBT keycaps on top, and voilà!

# Conclusion
My first hardware project is done. But at what cost? Building this keyboard cost me much more time and money than anticipated, but on the other hand, I’m really happy with the result. The main reasons for the long delay were my exam period and waiting for (replacement) parts. I learned a lot along the way, and improved my soldering skills and desoldering skills.
I’m super happy with my Lily58L as a daily driver at work. The only other change I did was replacing the thick acrylic case with a thinner one half a year later.
The keyboard runs on QMK, a highly customizable firmware. It allows me to write using the amazing Bone 2 keyboard layout, create my own keyboard layers, move the mouse, and much more. I may write a post about it in the future.
# More
Comparing Survey Creation Platforms. I spent two months developing a survey creation platform, deployed it to >300k users and compared it to Google Forms and SurveyJS.
Check out a recent art post of mine.